Migrating from one server to another
- David Pinn
- Craig Schwarze [ProjectBalm]
This page applies to Risk Register for Jira Data Center and Jira Server
Migrating from one Jira Server instance to another Jira Server instance can be complicated when the target instance already contains data; it means you can't just copy the database across. Typically, administrators use Jira's Export/Import Tool, or the Project Configurator add-on, or the Configuration Manager add-on, or manual data entry, or some combination of those things. With a little understanding of the way Risk Register stores data, you'll be able to migrate your risk model, and other configuration data used by the Risk Register add-on.
How Risk Register stores its data
Risk Register stores most of its data inside Jira issues, as custom field values and as entity properties. Any of the automated export/import tools will bring those data across to the target Jira instance along with the other issue-related data, like Summary, Description, Status, and so on. In addition to custom field values and entity properties, Risk Register stores data in database tables that it creates for itself. Those tables live alongside Jira's own database tables in whatever database management system you choose for use by Jira. That might be PostgreSQL, Microsoft SQL Server, Oracle Database, MySQL, or something similar.
View add-on database tables
To see the database tables created by Jira add-ons, go to Administration -> System -> Plugin Data Storage.
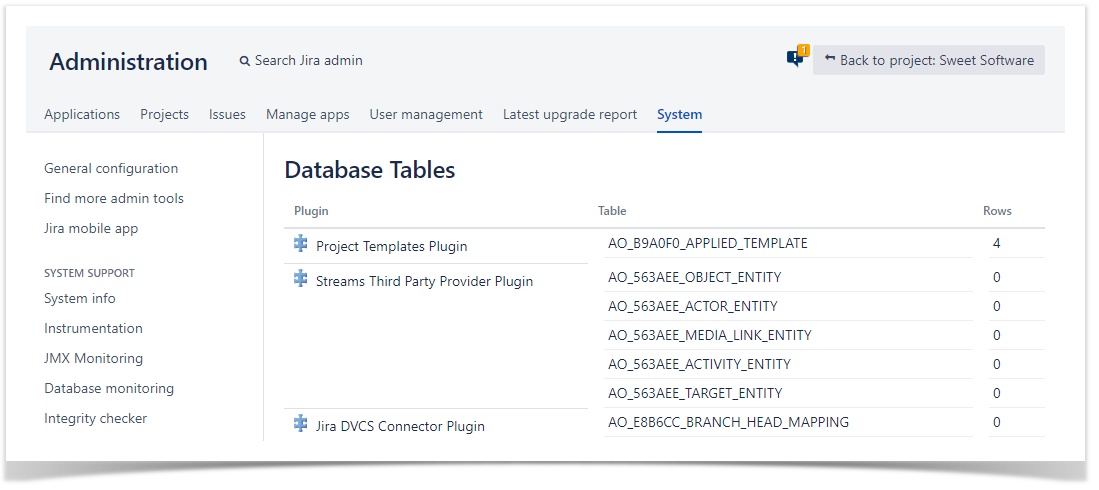
The tables that Risk Register creates are prefixed with "AO_A29AEA_":
AO_A29AEA_CONFIGAO_A29AEA_EXPOSUREAO_A29AEA_EXPOSURE_MAPPINGAO_A29AEA_RISK_REGISTER
The AO_A29AEA_ namespace is exclusive to the Risk Register add-on and is not shared with any other Jira components or add-ons.
Migration
We recommend that, before you begin the migration, you install Risk Register on the target Jira instance, then create a dummy risk register, and a dummy risk. That has two desirable consequences: a) it causes the "AO_A29AEA_XXX" tables to be created for you, and b) it creates the custom fields that Risk Register needs. Any references to custom fields in the database tables will refer to the correct custom field IDs.
Most of the automated migration tools pick up custom fields according to their names; that is, if you have a field called "Impact" in the source Jira instance, and there's an "Impact" custom field in the target Jira instance, then the migration tool doesn't create an additional "Impact" custom field; it just re-uses the one that already exists in the target.
Whatever tool(s) you use to perform the migration, you need to ensure that the contents of the "AO_A29AEA_XXX" tables in the target database are consistent with the custom fields and configuration entities present in the target Jira instance. There's no formula for performing that check; you just have to examine the contents of the tables and check that they are consistent with Jira's configuration. What we can do here is explain what the database values mean.
Risk Register's internal configuration table is named AO_A29AEA_CONFIG. It has just two columns: ATTR and VALUE.
The ATTR column refers to the following attributes:
- "RISK_ISSUE_TYPE_ID"
The id of the issue type that we're using as the type for risk issues.
We're keeping this in the database because that protects us from problems if the user later changes the name of the issue type. - "ANALYSED_STATUS_ID"
The id of the status that indicates that a risk has been analyzed; that is, it's probability and impact have been specified. - "CLOSED_STATUS_ID"
The id of the status that indicates that a risk has been closed. - "OPEN_STATUS_ID"
The id of the status that indicates that a risk has been created, but not yet analyzed. - "TREATED_STATUS_ID"
The id of the status that indicates that a risk has been treated; that is, it's treatment has been specified. - "RISK_SCREEN_SCHEME_ID"
The id of the screen scheme that we use for risk issues. - "PROBABILITY_FIELD_ID"
The id of the probability custom field. - "EXPOSURE_FIELD_ID"
The id of the exposure custom field. - "IMPACT_FIELD_ID"
The id of the impact custom field. - "CONTINGENCY_PLAN_FIELD_ID"
The id of the contingency plan custom field. - "REALIZATION_FIELD_ID"
The id of the realization custom field. - "RESIDUAL_EXPOSURE_FIELD_ID"
The id of the residual exposure custom field. - "RESIDUAL_IMPACT_FIELD_ID"
The id of the residual impact custom field. - "RESIDUAL_PROBABILITY_FIELD_ID"
The id of the residual probability custom field. - "TREATMENT_FIELD_ID"
The id of the treatment custom field. - "TREATMENT_PLAN_FIELD_ID"
The id of the treatment plan custom field. - "TREATMENT_LINK_TYPE_ID"
The id of the issue link type that represents risk treatment. - "WORKFLOW_NAME"
The name of the workflow that is recommended for use with risk issues. - "EMPTY_CELL_FILL"
Governs the appearance of empty cells in the risk matrix. Empty cells are those that don't contain any risks. - "ORIENTATION"
Whether the matrix shows impacts as rows and probabilities as columns or the other way around. - "USE_SLIDERS"
Whether to use slider controls to edit risk assessments.
To update the value for a particular attribute, you execute SQL like this:
UPDATE AO_A29AEA_CONFIG
SET VALUE="99999"
WHERE ATTR="RISK_ISSUE_TYPE_ID"
To find the ID of a custom field in the target Jira instance, you can either:
a) Hover over the EDIT menu item for the custom field in Jira's administration area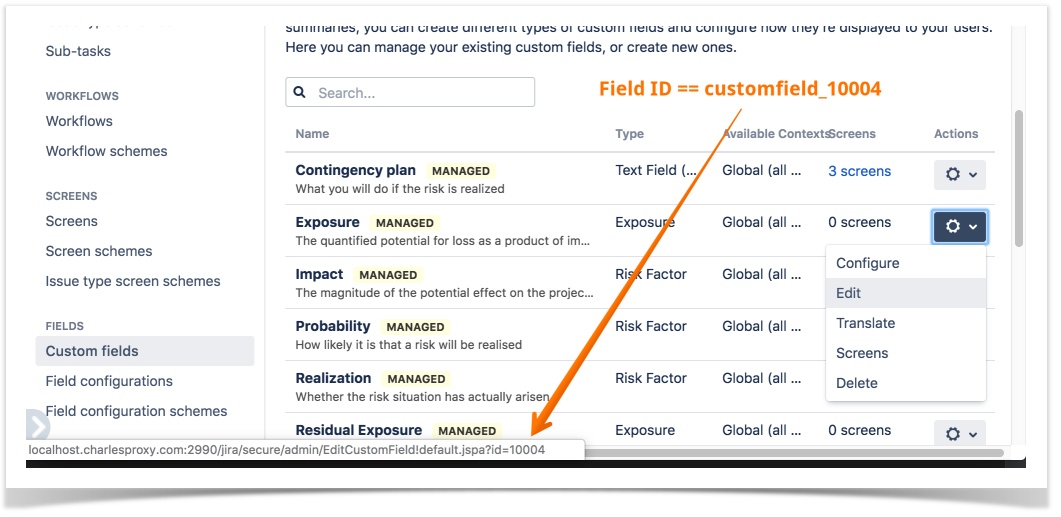
... or b) Get a JSON file of all of the custom fields in Jira, including their IDs.
To get a JSON file of all of the custom fields in Jira, you can run a curl command like this:
curl -H -k -u username:password -H 'Content-Type: application/json' -o 'cf.json' -X GET http://jira.mycompany.com/rest/api/2/field
Of course, you'll need to use a valid username:password, and use the correct context path for your Jira instance. For example, here's how I get the custom fields in my test instance:
curl -H -k -u admin:admin -H 'Content-Type: application/json' -o 'cf.json' -X GET http://localhost.charlesproxy.com:2990/jira/rest/api/2/field
The output will contain JSON objects of this form:
[{
"id": "customfield_10005",
"name": "Residual Exposure",
"custom": true,
"orderable": true,
"navigable": true,
"searchable": true,
"clauseNames": [
"cf[10005]",
"Residual Exposure"
],
"schema": {
"type": "any",
"custom": "com.projectbalm.riskregister.riskregister-jira:exposure-cf-type",
"customId": 10005
}
},
...
]
The "AO_A29AEA_EXPOSURE" table identifies the exposure values (risk levels). There's nothing that you need to do with that table.
The "AO_A29AEA_EXPOSURE_MAPPING" table maps impacts and probabilities to exposure values. The values in the "IMPACT" column refer to the IDs (not the names) of the options associated with the "Impact" custom field. The values in the "PROBABILITY" column refer to the IDs (not the names) of the options associated with the "Probability" custom field. You should ensure that the IMPACT and PROBABILITY column values are valid IDs for corresponding custom field options. If this is too tricky, you can alternatively manually re-configure the Risk Model in the Risk Register administration settings; doing that will set the values in the "AO_A29AEA_EXPOSURE_MAPPING" table to valid values.
The "AO_A29AEA_RISK_REGISTER" table merely contains the IDs of Jira projects that have been set up as risk registers. Check that the project IDs in that table are valid IDs for Jira projects that actually exist in the target Jira instance.
Once you've updated the contents of the AO_A29AEA_XXX tables, you should re-run the Jira indexer.
Related articles